How to Add Watermark in Lightroom (PC, Android, iOS) 2025
Are you looking to add a personal or professional touch to your photos by adding a watermark? Adobe Lightroom makes this task super easy, whether you’re on your desktop, Android, or iOS device. Watermarks help protect your images from unauthorized use and add a branded signature to your work.

In this guide, we’ll cover step-by-step instructions on how to add a watermark in Adobe Lightroom for desktop, Android, and iOS users. Let’s dive in!
Why Add a Watermark to Your Photos?
Before we jump into the process, let’s understand why adding a watermark is essential:
- Protect Your Work: Watermarks discourage unauthorized use of your photos.
- Branding: They help in creating a recognizable brand identity.
- Attribution: Watermarks ensure that your work gets proper credit when shared online.
How to Add Watermark in Adobe Lightroom (Desktop)
The desktop version of Adobe Lightroom offers the most customizable watermarking options. Follow these steps:
Step 1: Open Lightroom and Import Your Photos
- Launch Adobe Lightroom on your desktop.
- Click on the Library module and import your photos by clicking on the Import button at the bottom-left corner.
- Select the images you want to add a watermark to.
Step 2: Go to the Export Panel
- After editing your photos, click File > Export from the top menu.
- The Export Settings window will open.
Step 3: Enable the Watermark Option
- Scroll down to the Watermarking section in the Export panel.
- Check the box labeled Watermark.
Step 4: Customize Your Watermark

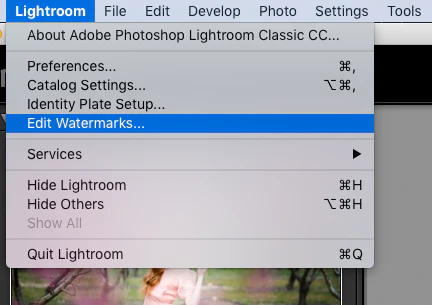
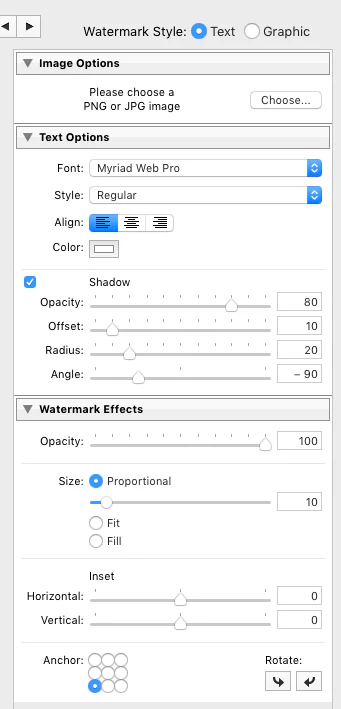
- Click on Edit Watermark to open the watermark editor.
- Choose between a Text Watermark or a Graphic Watermark.
- Text Watermark: Type your desired text (e.g., your name, brand, or copyright).
- Graphic Watermark: Upload a logo or an image file.
- Customize the font, size, color, opacity, and alignment. Adjust the watermark’s position and scale to suit your preference.

4. Click Save to finalize your watermark settings.
Step 5: Export Your Photos
- Choose the export location and file format.
- Hit the Export button to save your watermarked images.
How to Add Watermark in Lightroom (Android)
If you’re using the Lightroom mobile app on Android, follow these steps to add watermark in Lightroom Mobile:
Step 1: Open Lightroom App
- Launch the Lightroom app on your Android device.
- Import the photo you want to edit by tapping the Add Photos button.
Step 2: Edit Your Photo
- Make your desired edits using Lightroom’s powerful editing tools.
- Once you’re satisfied, move on to watermarking.
Step 3: Add a Watermark
- Tap on the three-dot menu in the top-right corner.
- Select Export As from the menu.
Step 4: Customize the Watermark
- Toggle on the Include Watermark option.

- Tap Customize to edit your watermark.

- Type your text or upload a graphic.
- Adjust the size, placement, and opacity of your watermark to your liking.
Step 5: Export Your Photo
- Choose the file format and resolution.
- Tap Export to save your watermarked photo to your device.
How to Add Watermark in Lightroom (iOS)
Adding a watermark in Lightroom on iOS devices is similar to the Android process. Here’s how you can add watermark in Lightroom:
Step 1: Open Lightroom App
- Launch Lightroom on your iPhone or iPad.
- Import the photo you want to watermark by tapping the Add Photos icon.
Step 2: Edit Your Photo
- Use Lightroom’s editing tools to enhance your photo.
- Once your edits are complete, proceed to watermarking.
Step 3: Add a Watermark
- Tap on the three-dot menu (•••) in the top-right corner.
- Choose Export As from the menu options.
Step 4: Customize the Watermark
- Enable the Include Watermark toggle.
- Tap Customize to personalize your watermark.
- Add text or upload an image for your watermark.
- Adjust its position, size, and transparency.
Step 5: Save Your Watermarked Photo
- Select your preferred file format and quality settings.
- Tap Export to save the photo to your camera roll.
Pro Tips for Watermarking in Lightroom
- Keep It Minimal: A watermark should protect your work without being too distracting.
- Maintain Consistency: Use the same watermark design across all your photos to build a consistent brand.
- Test Different Placements: Experiment with different placements to ensure your watermark doesn’t cover the photo’s main elements.
Conclusion
Adding a watermark in Adobe Lightroom is a straightforward process, whether you’re using the desktop version or the mobile app on Android or iOS. By following this step-by-step guide, you can protect your images, promote your brand, and share your work confidently.
Start watermarking your photos today and give your creative work the credit it deserves!


