How to Import Presets in Lightroom in 2025?
Adobe Lightroom presets are the most powerful editing tools that convert your images into high-fidelity, attractive photos.
Here, we will discuss how to import presets in Lightroom CC, Lightroom Classic, or Lightroom Mobile.
Installing Presets into Lightroom Classic
Professional photographers commonly use Lightroom Classic for large projects. Lightroom presets support .XMP format in Lightroom. Here is step by step guide to the installation process:
Method 1: Using the “Import Presets” option
- First of all, download the Lightroom Presets on your device.
- After downloading the Presets on your PC, turn on the “develop” module in the top right corner of the Lightroom Classic interface.
- On the left side, click the “Presets” panel and select Import.

- Select the preset file you want to install and click the import button.
- To create a new folder, right-click in the preset panel and choose new folder.
- Name the folder and drag the preset into it.
The file you import will appear in your Lightroom preset panel under the “user presets” section.
Method 2: By using the “Drag and Drop” option
- Downloading the presets on your computer.
- Open your computer’s “File Explorer” for Windows or “Finder” for Mac and select the folder where you downloaded the presets on your computer.
- Select the file you want to import and drag it to the Lightroom Classic.
- A dialog box will appear, click on the “import” option.
- To create a new folder, right-click in the preset panel and choose new folder.
Your imported file will appear in your Lightroom preset panel under the “user presets” section.
Method 3: By using Lightroom Classic Preferences
- Go to Lightroom Classic’s top menu in the “Edit” bar and select “Preferences”.
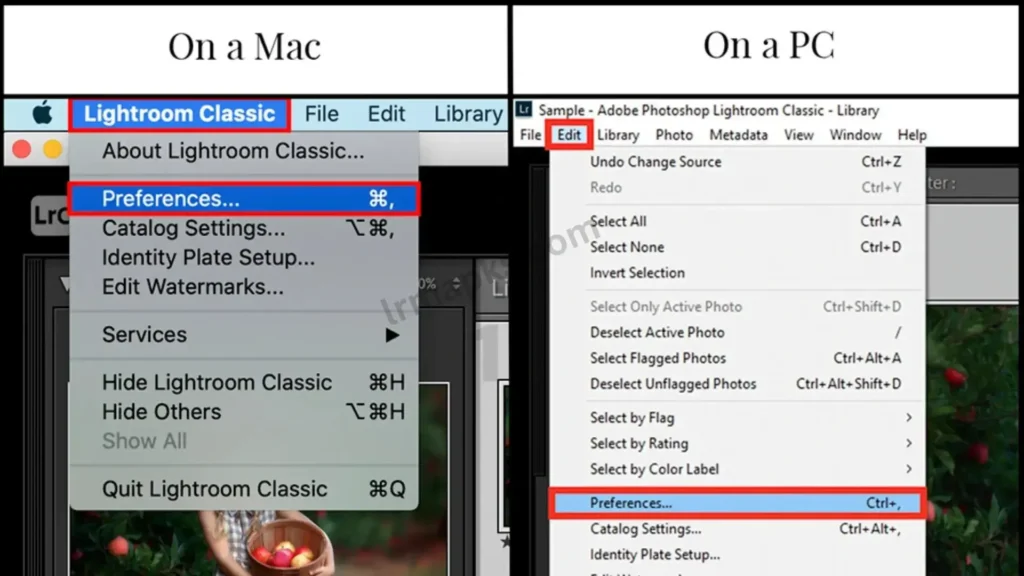
- A dialog box will appear, click on the “Presets” tab.
- In the next tab click on the button “Show Lightroom Develop Presets”.
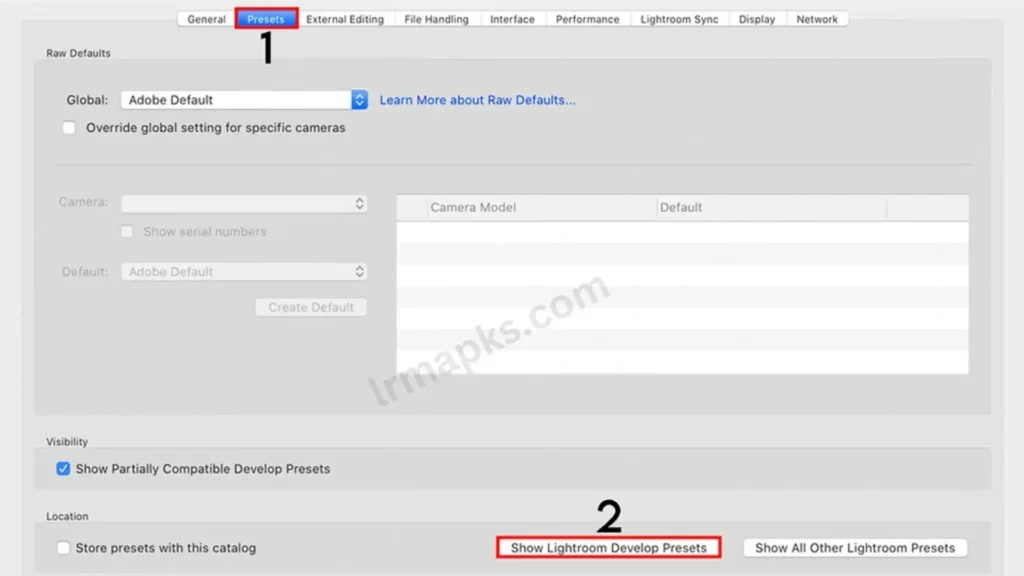
- The presets that have been pre-downloaded are in the next folder. You can copy or move the presets you want to import.
- If you go back and reload the Lightroom page, you will see the imported presets under the “user presets” section.
How to import Presets in Lightroom Mobile
There are three methods of how to import presets in Lightroom Mobile:
- Import XMP presets from local storage.
- Import with DNG files.
- Synchronization with Lightroom Desktop.
1. Import XMP presets from local storage
- Start by downloading the Lightroom app on your Android mobile device.
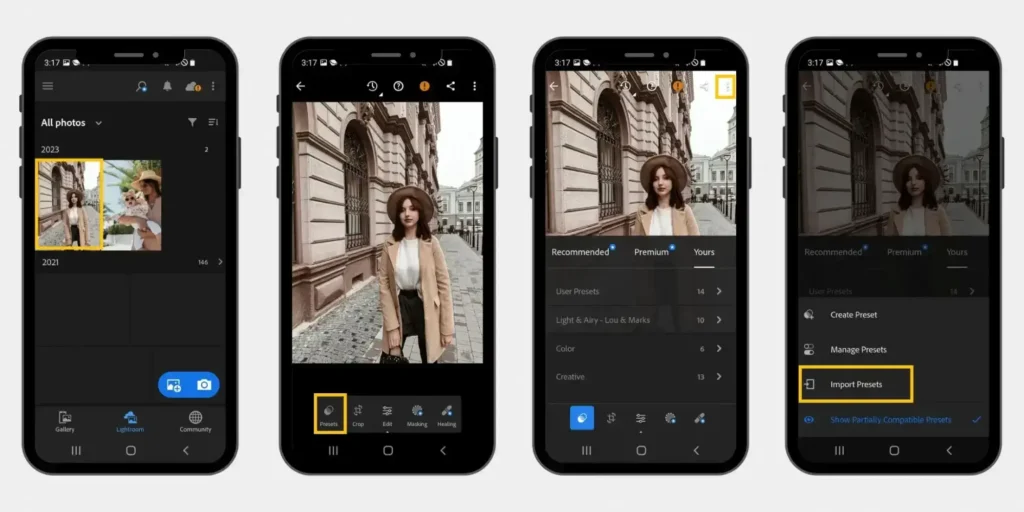
- Open a photo you want to edit or create a new project.
- At the bottom of the screen, click on the presets panel.
- Tap the 3 dots icon in the upper right corner and select import presets.
- Select the preset you want to import from the folder or Google Drive where your files are located. (You can select multiple files at once if needed).
- Tap “import” or “add” to import presets on Lightroom Mobile.
- Your imported presets will appear in the presets panel.
- Select the image you want to edit and tap on the preset name. Lightroom will apply the preset to the image.
- You can make further adjustments to your image according to your choice by using editing tools.
2. Import with DNG files
- First of all, download the Lightroom Mobile presets in DNG format.
- Tap the “+” icon or “Add Photos” to import DNG files.
- Select the “from file” option and navigate to the folder where your files are downloaded.
- Select the file you want to import, or you can select multiple files at once if needed.
- Tap the “Add” or “Import” button to import your files into Lightroom.
- Give a descriptive name to your preset.
- Tap the “save” or “create” button to save the preset.
- Your preset will show in the Lightroom Mobile presets library.
- To apply a preset to your photo, select or open the image, go to the presets section, and select the preset you just imported.
- Your selected preset will be applied to your image, and you can make further adjustments to your photo according to your choice.
- Now you can save or export your image.
3. Synchronization with Lightroom desktop
Installing and importing Lightroom presets on your desktop or PC will save them on all your devices due to their cloud ID. You don’t need to install presets separately on your mobile device.
Conclusion
You can use any of the above methods to import presets into Lightroom. Now, you can edit your photos seamlessly by applying amazing presets. When you are done importing the presets from one method, there is no need to try the other one.

